How to Reduce Belly Fat by Yoga? (15 Best Yoga for Belly Fat Loss)
Most Effective Yoga to Lose Belly Fat

Seated Forward Bend – Paschimottanasana
- Commence by sitting with your legs straight in front of your body.
- Bring your arms straight to the sides and up to the ceiling above your shoulders.
- Inhale and lift your spine for a long time.
- Start coming forward as you exhale, hinging at your hips. Imagine your pelvis as a tub of forwarding tipping water.
- Lengthen the spine on each inhale. To do this, you can come out of your forward bend somewhat.
- Deepen into your forward bend upon each exhale. Instead of your nose coming to your feet, imagine your belly coming to rest on your thighs. This will help you retain a long spine.
- Keep the neck as the spine’s normal extension, neither cranking it to look up nor letting it go entirely.
- With the spine long, decide whether you want to remain here or let your spine round forward when you have reached your full extension.
- Take hold of your shins or ankles, wherever you can reach. A harness around your foot may also be used. Keep your feet highly flexed throughout.
Benefits
- Lower back stretches and hamstrings and hips.
- The abdominal and pelvic organs are massaged and toned.
- Shoulders get toned.
Boat Pose – Naukasana
- With your knees bent and your feet flat on the floor, begin in a seated position.
- Lift your feet away from the floor. Initially, keep your knees bent. Place your shins parallel to the ground. It’s a half-boat pose.
- Naturally, the torso will fall down, but do not let the spine go round.
- Extend your legs to an angle of 45 degrees. You want to hold the body as straight as you can so that the legs have a V shape.
- With your palms turned up, roll your shoulders back, and straighten your arms approximately parallel to the floor.
- Do your best to balance the sitting bones, but it’s natural if you rest slightly behind them. To encourage equilibrium, concentrate on raising your chest.
- For at least five breaths, sit.
- With an exhale, relax your legs. Inhale and sit up, then.
Benefits
- It helps strengthen muscles of the back and abdomen
- Tones the muscles of the leg and the arm
- Useful for hernia sufferers
Upward Plank Pose (Purvottanasana)
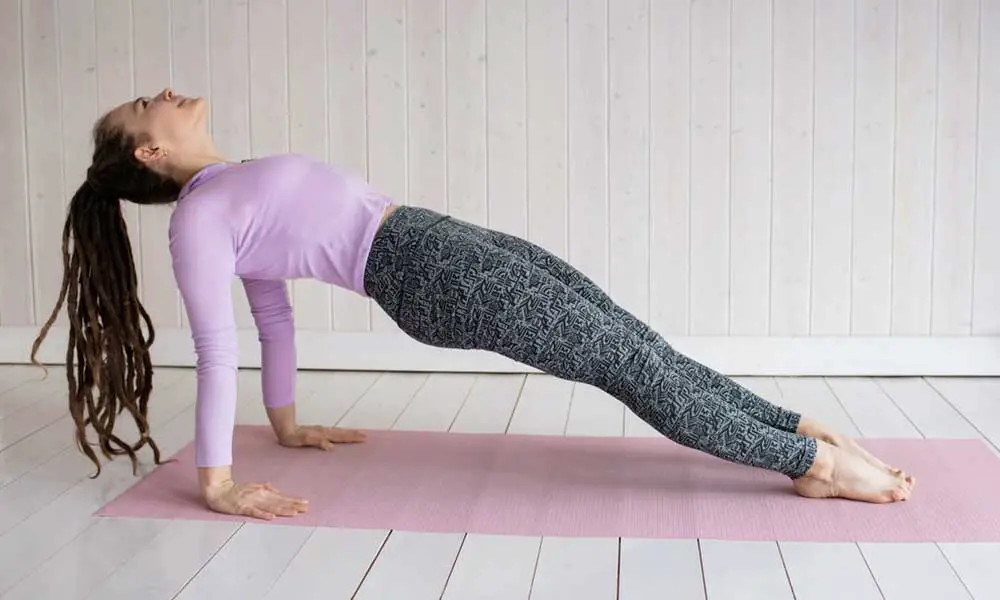
- You are expected to begin with the Staff Pose or the Dandasana. Place your hands behind your hips so that the tips of your fingers point to your feet. With your knees bent, place your feet firmly on the ground. Your feet must be divided by hip width.
- Breath out. Lift your hips, place your hands and feet closely on the floor. So, they’re in the very same line as your elbows. It is safest to get your arms straightened.
- Involve your spinal muscles as you stiffen your legs and aim your toes towards the outside. As high as you can, lift your hips and retain tight glutes and solid legs.
- Raise your chest and enable your shoulders to roll on your back. Let your head hang behind you, but watch your neck, carefully.
- For as long as you are relaxed, keep the asana, and then release the pose.
Benefits
- Strengthens hands, arms, elbows, neck, and back.
- Strengthen the legs and hips.
- Enhances breathing features.
- Extends bowels and organs of the abdomen.
- Stimulation of the thyroid
Bridge Pose – Setubandhasana
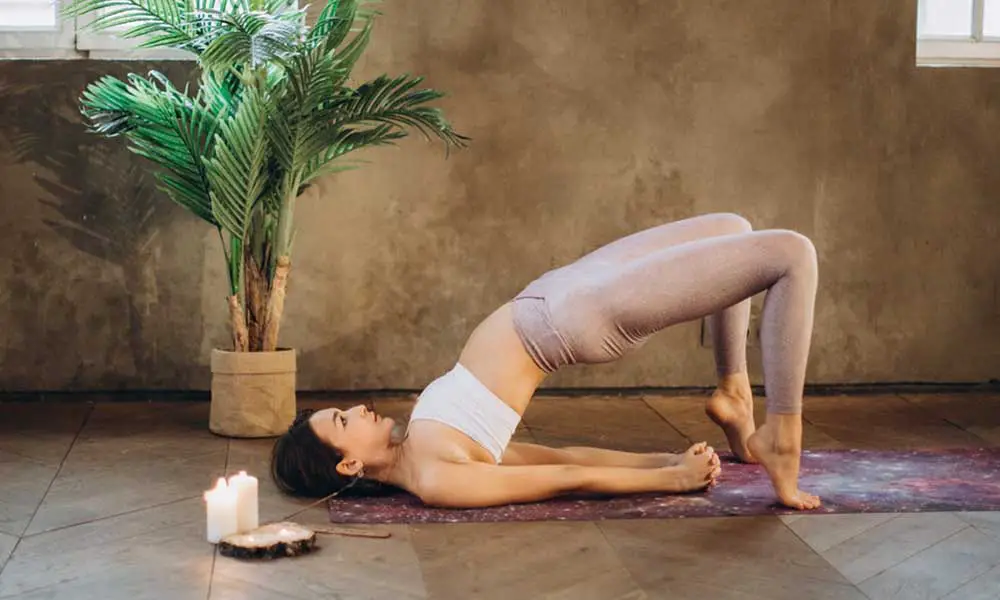
- By lying flat on your back, initiate the asana.
- Bend your knees and spread your feet in about a hip-width on the ground. Make sure that a straight line is drawn on your ankles and knees.
- Have your arms rest beside your body, facing downward with your hands.
- Inhale, and raise your back off the floor (lower, upper, and middle). Roll your shoulders back to make sure that your head touches your chest without lifting it. Let your weight be borne by your shoulders, feet, and arms.
- When you tighten them, firm up your buttocks. Make sure that the thighs are parallel to the floor and to each other.
- To raise your torso higher, interlace your fingers and drive your hands harder towards the ground.
- Keep that pose for a minute, at least. Breathe deeply and gently.
- Exhale and release the pose.
Benefits
- Your digestion is enhanced.
- Brain relaxation, anxiety, and stress reduction.
- Back muscles are strengthening.
- You are pumping your lungs with more air and improving overall body efficiency.
- Helpful in asthma and hypertension.
- Stretch your spine and your legs every day.
- It is relaxing the menopause symptoms.
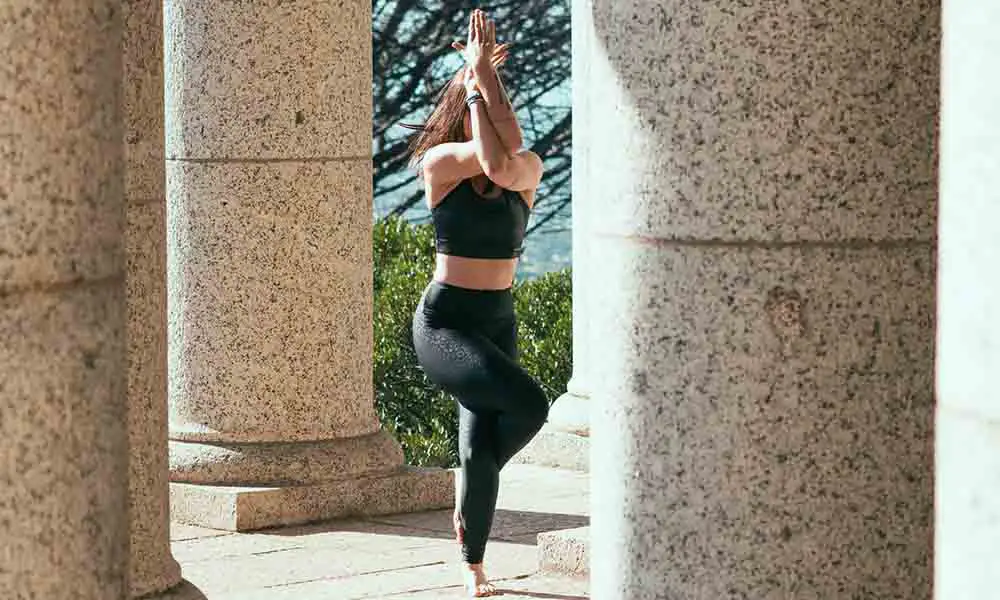
Tree Posture – Vrikshasana
- Stand fully straight and lower your arms to the side of your body.
- Bend your right knee slightly, and then put your right foot high on your left thigh. Make sure the sole is positioned on the root of the thigh, powerful and smooth.
- Your left leg needs to be completely erect. Breathe, and seek your equilibrium once you have adopted this position.
- Now, inhale and gently lift your arms above your head in a ‘namaste’ mudra and put them together.
- Look at a distant object directly and hold your eyes. This will help you maintain equilibrium.
- Keep a straight spine. Remember that there is a need for your body to be taut but elastic. Take deep breaths, and calm your body more every time you exhale.
- Lower your hands gently from the sides, and release the right knee.
- Like you did at the start of the practice, come back to the original posture of standing tall and straight. With the left knee, repeat this pose.
Benefit
- It stretches and invigorates your legs, your back, and your arms.
- This gives equilibrium and balance to your mind.
- This helps increase focus.
- It has been found that this pose relieves certain cases of sciatica.
- This makes the legs powerful, improves stability, and opens the hips.
5 Power yoga for belly fat
Wind Releasing Pose – Pawanmuktasana
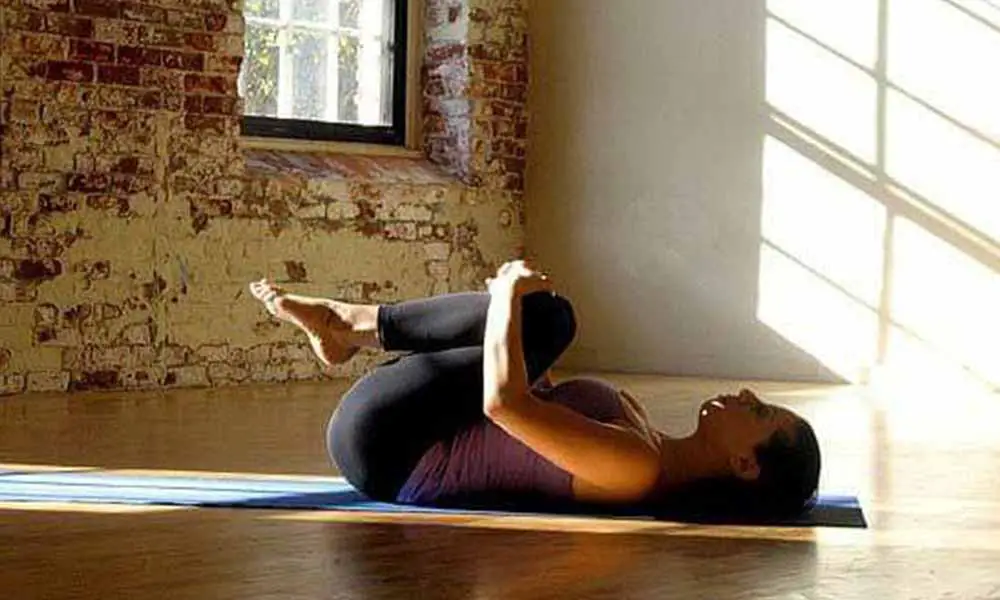
- On a smooth surface, lie flat on your back- ensuring that your feet are together and your arms are positioned next to your neck.
- Grab a deep breath. Bring your knees towards your chest as you exhale, and press your thighs against your belly. As if you were hugging your knees, clasp your hands around your thighs.
- When you breathe normally, keep the asana. Make sure you tighten the grip of your hands on the upper shins each time you exhale and raise the pressure on your chest. Make sure you loosen the grip every time you inhale.
- After you rock, exhale and release the pose, and roll from side to side about three to five times. Unwind. Relax.
Benefits
- The posture provides substantial relief to flatulence by movement and expulsion.
- Favorable enhancement of the abdominal, subnormal abdominal, and pelvic functions in cases of a flabby belly.
- Relief of chronic and lenient liver constipation.
- Muscles are stretched to include the elbow, triceps, full gluteus, and hamstrings.
- Provides profound-internal massage pressure.
Bow Pose – Dhanurasana
- Lay flat on your back, keeping the hip-width apart of your feet and the arms beside your body.
- Then, fold your knees towards you gently and grab your ankles.
- Breathe in, and raise your chest and legs off the floor. Pull back the legs.
- Look straight and maintain a stress-free face.
- As you focus on breathing, keep the pose. Your body ought to be as taut as a bow.
- Breathe long and hard as you get relaxed in the pose.
- Exhale and release the pose roughly 15-20 seconds later.
Benefits
- Extends the whole body, the knees, the thighs and groins, the chest and belly, the throat, and psoas (psoas)
- Enhances the muscles of the back
- Enhances posture
- Triggers the belly and neck organs
Warrior Pose – Virbhadrasana
- Commence with Mountain Pose.
- Jump or step horizontally with your left foot so that your feet are roughly four feet apart.
- Shift your left foot 90 degrees to the left and place your right foot roughly 45 degrees to the left and lift both hands up to join the palm and look at the thumb.
- Rotate your body to the left to breathe out, and bend your knee.
- Ensure the knee is positioned right above the ankle. Bending too far will result in a serious accident to the knee.
- Hang right here for 30 seconds or so. Inhale, straighten the leg, lower the hands and exhale back to the pose of the mountain.
Benefits
- Enhances and tones the lower back, legs, and sides.
- It increases the body’s balance and helps increase endurance.
- Beneficial for those with deskbound or sedentary work.
- Very effective in the event of frozen shoulders.
- In a short period, it very quickly releases tension on the shoulders.
- It brings generosity, bravery, grace, and peace.
Tadasana
- Stand upright and bring your feet together, touching each other with your toes. The heels can only be slightly apart, and it is important to position your hands firmly next to your body.
- You’ve got to make the thigh muscles firm. Raise your kneecaps, thus ensuring that the lower portion of your belly does not harden.
- Strengthen as you raise the inner arches of your inner ankles.
Benefits
- Enhances posture
- Strengthens calves, elbows, and thighs
- Abdomen and buttocks get firm
- Sciatica Relieves
- Minimizes flat feet
Double Angle Pose – Dwikonasana
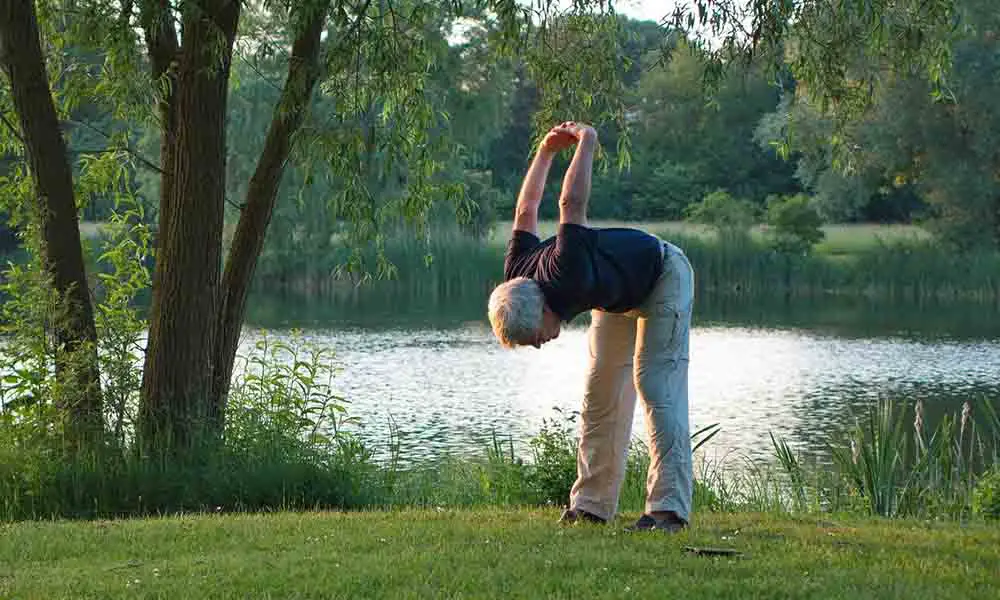
- With your feet 30 cm apart, stand upright.
- Keep your arms behind your back and interlock your fingers with them.
- Breath out and lean over from the hips, such that the back and the face are parallel to the ground.
- Lift your arms as high as possible behind your back.
- As a lever, the arms work and emphasize the stretch provided to the shoulders and chest.
- Stay for a while in the final position, then drop the arms to the back. Breath in and switch to the upright position afterward.
- perform the practice five times
Benefits
- Reinforces the spine.
- The chest, lungs, shoulders, and abdomen are stretched.
- Stimulates organs in the belly.
- It helps to ease anxiety and exhaustion.
- It opens the lungs and heart.
- Sciatica soothes.
- preventive for asthma
5 Other yoga poses for belly fat
Cobra Pose – Bhujangasana
- Place your palms flat straight under your shoulders on the surface. Bend your elbows directly back and hold your sides with them.
- With your neck in a neutral stance, stop for a moment and look straight down at your mat. Only anchor the pubic bone to the floor.
- Breath in and push the floor off your chest. Roll back your shoulders and keep the floor on your low ribs. Ensure that your elbows continue hugging your arms. Don’t allow them on either side to wing out.
- Keep neutral around your neck. Don’t pump up on that. Your gaze needs to remain on the surface.
- Exhale to re-release to the floor
Benefits
- Can improve energy and battle fatigue
- Improves posture
- Can assist in relieving lower back pain
- Can counteract slouching and spine kyphosis
- Stretches the stomach
- Strengthens the muscles around the shoulders, arms, and back
Eagle Pose – Garudasana
- Shift your weight to your foot on the left.
- Only pick your right foot off the floor.
- Cross your right leg as far up the thigh as possible over your left thigh.
- Hook around your left calf with your right foot.
- Bring both of your arms out in front of you and parallel to the surface.
- Bend your knees, then cross your left arm over your right and hook your elbows. Draw your forearms together with hooked arms and tie your right palm around your left palm, crossing your wrists. (The opposite arm should be on top of whichever leg is on top.)
- Thus holding the shoulders falling down from your ears, lift the elbows to the height of your shoulders.
- Keep the spine perpendicular to the floor, with the head crown rising.
- Keep yourself for 5 to 10 breaths.
Benefits
- It strengthens the ankles and calves and stretches them.
- The thighs, hips, elbows, and upper back are spread.
- Enhances concentration.
- Improved sense of equilibrium
Pigeon Pose – Mayurasana
- Start by sitting on one of your heels. Ensure that the knees are wide apart.
- Position your hands on the ground and let your fingers stress toward your body. Bend the elbows gently and press them against the abdomen.
- You’ve got to hold a firm belly. Drop your head on the floor to do this and build up the power in your stomach.
- Extend your legs out so that your knees are straight, and the ground should be facing the upper portion of your feet.
- It’s necessary to get your shoulder blades firm and pushed into your back. Pull your buttocks close and lift your head. Set forward your gaze.
- Transfer the body’s weight forward and raise your legs off from the ground. Your body needs to be pulled by the weight of your arms. The surface should be parallel to it.
- At first, keep the position for around 10 seconds. You should be able to keep it for up to one minute, with experience.
- Lower your head and feet on the ground to free them. Unwind. Relax.
Benefits
- The digestive system is toned, and the internal organs are rejuvenated.
- The digestive heat makes it so efficient that any form of food can be digested, minimizing the generation of toxins in the digestive tract due to undigested food.
- Efficient detox pose.
- Enhances energy and sexual vitality.
- It enhances the muscles of the arms and shoulders. It also helps relieve constipation, piles, and diabetes-related disorders.
Cow-face Pose – Gomukhasana
- Sit, keeping your back upright and legs straight in front of you.
- Bring your feet together now, and keep your hands right next to your hips.
- Bend your right leg and bring your left buttock underneath your right foot.
- Layer over your right knee with your left knee.
- Kindly extend your left arm over your head and fold your elbow. Bring the right arm around your back at the same time and interlock both palms.
- Take some deep breaths and stay for as long as you’re confident.
- Now, relax your arms as you exhale.
- Unclench your legs, and continue with the other leg
Benefits
- Contributes to elevated blood pressure
- With daily practice, sexual organs are toned and massaged
- Stiff Shoulder is Cured.
- Spine Elongates
- Beneficial for those who have poor posture
- Reduces anxiety and tension
Camel Pose – Ushtrasana

- Stand on your feet and kneel down. Hold the feet and knees slightly apart.
- Raise yourself on your knees now.
- Stretch your hands backward and bend your head and back slowly with a raised chin. You’ll be able to position your hands on either side of your hips. In this middle position, stabilize yourself.
- Now go on stretching until you reach down with your hands and feel the heels of your feet. Let your hands rest on your heels. Ensure that the chest is expanded and that the neck is bent sideways with a look at the stars.
- Remain for as long as you are happy in this place. Depending on your comfort level, you could go from 30 seconds to 3 minutes.
- Inhale and return to the kneeling position to unlock the position. Beginners should be careful not to lose their balance and drop during the return.
- You can rest for some time once you’re in the kneeling position.
Benefits
- It decreases thigh fat.
- Opens the legs, with deep hip flexors stretching.
- Stretches the elbows and back and strengthens them.
- Expands the abdominal area, promoting and eliminating digestion.
- Enhances posture.
Conclusion
It is best to perform these flat stomach asanas in the mornings for better performance. In seeing the success of the asanas, continuity plays a major role. When you want to use yoga to lose weight, make a promise to yourself and your practice. Make tiny improvements and set modest targets so that you are more likely to stick to them.
You may find yourself naturally drawn to healthier foods and ways of living as you deepen your practice and understanding. Although you’re not guaranteed to lose weight, it’s certainly possible. Your favorable outcomes will stretch well beyond weight loss.